Picture this: You're cruising down the road, windows down, enjoying the drive. Suddenly, a strange smell wafts into the cabin, and the temperature gauge starts creeping into the red zone. You pull over, pop the hood, and are greeted by a disturbing sight – your coolant is bubbling like a witch's brew! What's going on, and more importantly, how do you fix it?
Discovering your coolant is bubbling can be incredibly stressful. It often happens at the worst possible moment, leaving you stranded and worried about potentially serious engine damage. The uncertainty of what's causing it and the potential cost of repairs only adds to the anxiety.
This article dives into the common reasons why your coolant might be bubbling, helping you understand what's happening under the hood and what steps you can take to address the issue. We'll explore everything from simple problems like a low coolant level to more complex issues like a blown head gasket. By the end, you'll be better equipped to diagnose the problem and decide on the best course of action, whether that's a DIY fix or a trip to your trusted mechanic.
Essentially, coolant bubbling usually signals an issue with your car's cooling system. It could be anything from trapped air, overheating, a failing radiator cap, a clogged radiator, or even a more serious problem like a head gasket leak. Understanding these potential causes is the first step in getting your car back on the road and preventing further damage. We'll cover each of these possibilities in detail.
Low Coolant Level: A Simple Culprit
I remember one scorching summer afternoon, I was driving my old pickup truck when the temperature gauge started climbing rapidly. Panic set in, thinking the worst. I pulled over immediately and cautiously opened the hood. Sure enough, the coolant reservoir was practically empty! After the engine cooled down a bit, I carefully added coolant, and the problem vanished. It was a simple fix, but the initial scare was significant. This experience taught me the importance of regularly checking coolant levels.
A low coolant level is often the easiest cause to identify and rectify. Your cooling system needs enough coolant to effectively transfer heat away from the engine. If the level is too low, the remaining coolant can overheat and boil, creating those telltale bubbles. Low coolant can be caused by a leak in the system – check hoses, the radiator, the water pump, and even the coolant reservoir itself for any signs of drips or puddles. A leak can develop from something as simple as a loose hose clamp or a crack in a plastic component due to age and wear. If you find that you are constantly topping off your coolant, you definitely have a leak that needs to be addressed. Ignoring a low coolant level can quickly lead to overheating and significant engine damage, so this is one symptom you don't want to ignore. Coolant leaks should be addressed immediately, and if you can't find the source, consider seeking professional help.
Overheating: The Boiling Point
Overheating is a prime suspect when your coolant is bubbling. When your engine gets too hot, the coolant reaches its boiling point, leading to the formation of bubbles. Several factors can contribute to overheating, including a faulty thermostat, a clogged radiator, a malfunctioning water pump, or even a blocked cooling fan. The thermostat regulates the flow of coolant through the engine, and if it's stuck closed, coolant can't circulate properly, causing the engine to overheat. A clogged radiator restricts coolant flow, reducing its ability to dissipate heat. The water pump is responsible for circulating coolant throughout the system, and if it fails, coolant won't be properly distributed, leading to overheating. Finally, the cooling fan helps to cool the radiator, and if it's not working, the radiator won't be able to effectively dissipate heat, especially when you're driving slowly or idling in traffic. If you suspect overheating, it's crucial to stop driving immediately and let the engine cool down before attempting any repairs. Continuing to drive an overheated engine can cause severe damage, including a cracked cylinder head or a blown head gasket.
Radiator Cap Issues: Pressure Problems
The radiator cap might seem like a small, insignificant component, but it plays a crucial role in maintaining the pressure within your cooling system. This pressure raises the boiling point of the coolant, preventing it from boiling over at normal operating temperatures. A faulty radiator cap can't maintain the correct pressure, causing the coolant to boil at a lower temperature, resulting in bubbling. Over time, radiator caps can corrode, crack, or simply lose their ability to seal properly. This can lead to pressure loss and coolant boiling. Another function of the radiator cap is to vent excess pressure. If the valve is stuck closed, excessive pressure can build up, potentially damaging other components in the cooling system. A simple way to check your radiator cap is to look for signs of corrosion or damage. You can also have it pressure tested at most auto parts stores. Replacing a faulty radiator cap is a relatively inexpensive and easy fix that can prevent more serious problems down the road. Always use a radiator cap that is specifically designed for your vehicle, as different vehicles require different pressure ratings.
Clogged Radiator: A Flow Restriction
Imagine your arteries clogged with plaque – that's essentially what happens to your radiator over time. Debris, rust, and mineral deposits can accumulate inside the radiator, restricting coolant flow and reducing its ability to dissipate heat. This can lead to localized overheating and coolant bubbling. A clogged radiator is a gradual process, often developing over years of neglect. The type of coolant you use can also affect how quickly your radiator clogs. Using the wrong type of coolant or failing to flush and replace it at the recommended intervals can accelerate the buildup of deposits. Signs of a clogged radiator include overheating, reduced heater performance, and visible debris in the coolant. You can try flushing the radiator with a radiator flush solution to remove some of the deposits. However, in severe cases, the radiator may need to be professionally cleaned or replaced. Prevention is key here – using the correct coolant and performing regular coolant flushes will help keep your radiator clean and functioning properly.
Head Gasket Leak: A Major Concern
How to Identify a Head Gasket Leak
A blown head gasket is a more serious issue that can cause coolant bubbling. The head gasket seals the combustion chamber and prevents coolant from mixing with engine oil or entering the cylinders. When a head gasket fails, combustion gases can leak into the cooling system, causing pressure and bubbles. This is often accompanied by other symptoms, such as white smoke from the exhaust, loss of coolant, and oil contamination. Identifying a head gasket leak can be tricky, as the symptoms can be similar to those of other cooling system problems. However, some telltale signs include: Bubbles in the coolant reservoir, even when the engine is not overheating. White smoke from the exhaust, especially on startup. A milky or foamy appearance in the engine oil. Overheating. Loss of coolant with no visible leaks. If you suspect a head gasket leak, it's essential to have your vehicle inspected by a qualified mechanic. Repairing a blown head gasket is a complex and expensive job, but ignoring it can lead to even more serious engine damage.
Checking for Exhaust Gases in the Coolant
One definitive test for a head gasket leak is to check for the presence of exhaust gases in the coolant. This can be done using a special testing kit that contains a chemical that changes color in the presence of exhaust gases. The test involves drawing a sample of air from the coolant reservoir through the chemical solution. If the solution changes color, it indicates that exhaust gases are present, confirming a head gasket leak. This test is relatively simple to perform and can be done at home or by a mechanic. It's a valuable tool for diagnosing head gasket problems and can help avoid unnecessary repairs. Another method is a compression test to determine if any cylinders are losing compression. This test involves removing the spark plugs and using a gauge to measure the compression in each cylinder. Low compression in one or more cylinders can indicate a head gasket leak. Performing both of these tests will help to accurately diagnose the problem and determine the appropriate course of action.
Symptoms of a Bad Head Gasket
The symptoms of a bad head gasket can vary depending on the severity of the leak. In mild cases, you may only notice occasional coolant bubbling or slight overheating. However, in more severe cases, the symptoms can be much more pronounced. These may include: Excessive white smoke from the exhaust. Significant coolant loss. Overheating, even in mild weather. Milky or foamy oil. A sweet smell coming from the exhaust. A rough-running engine. If you experience any of these symptoms, it's important to have your vehicle inspected by a mechanic as soon as possible. Delaying repairs can lead to further engine damage and potentially more costly repairs down the road. Remember, catching a head gasket leak early can save you a lot of money and headaches in the long run. Be vigilant and pay attention to any unusual symptoms your car may be exhibiting.
Using a Block Tester
A block tester is a specific tool designed to detect combustion gases in your coolant. It's a clear plastic cylinder with two chambers separated by a blue test fluid. You attach the tester to your radiator or coolant reservoir, start the engine, and draw air from the cooling system through the fluid. If combustion gases are present, they'll react with the fluid, causing it to change color, usually to yellow or green. It’s a definitive sign of a head gasket leak or a cracked cylinder head. Block testers are readily available at auto parts stores and online retailers. They are relatively inexpensive and easy to use, making them a valuable tool for DIY mechanics. The test is most accurate when the engine is warm, as the heat helps to expand the combustion gases, making them easier to detect. Be sure to follow the instructions carefully to ensure accurate results. If you're unsure about performing the test yourself, consult with a qualified mechanic.
Fun Facts About Coolant
Did you know that coolant isn't just for keeping your engine cool? It also helps to prevent corrosion and freeze damage. Ethylene glycol, a common ingredient in coolant, lowers the freezing point of water, preventing it from freezing and cracking your engine block in cold weather. It also contains additives that protect against rust and corrosion. The history of coolant dates back to the early days of automobiles, when water was used as the primary coolant. However, water has a high freezing point and a low boiling point, making it unsuitable for many climates. In the 1920s, ethylene glycol was introduced as a more effective coolant, and it quickly became the industry standard. Coolant also comes in different colors, such as green, yellow, pink, and blue. The color indicates the type of additives used in the coolant and whether it's compatible with your vehicle's cooling system. It's important to use the correct type of coolant for your vehicle to avoid damage to the cooling system components. Mixing different types of coolant can also lead to problems, so it's best to stick with the type recommended by the manufacturer. Coolant is a fascinating substance with a rich history and a vital role in keeping our engines running smoothly.
How to Check Coolant Level and Condition
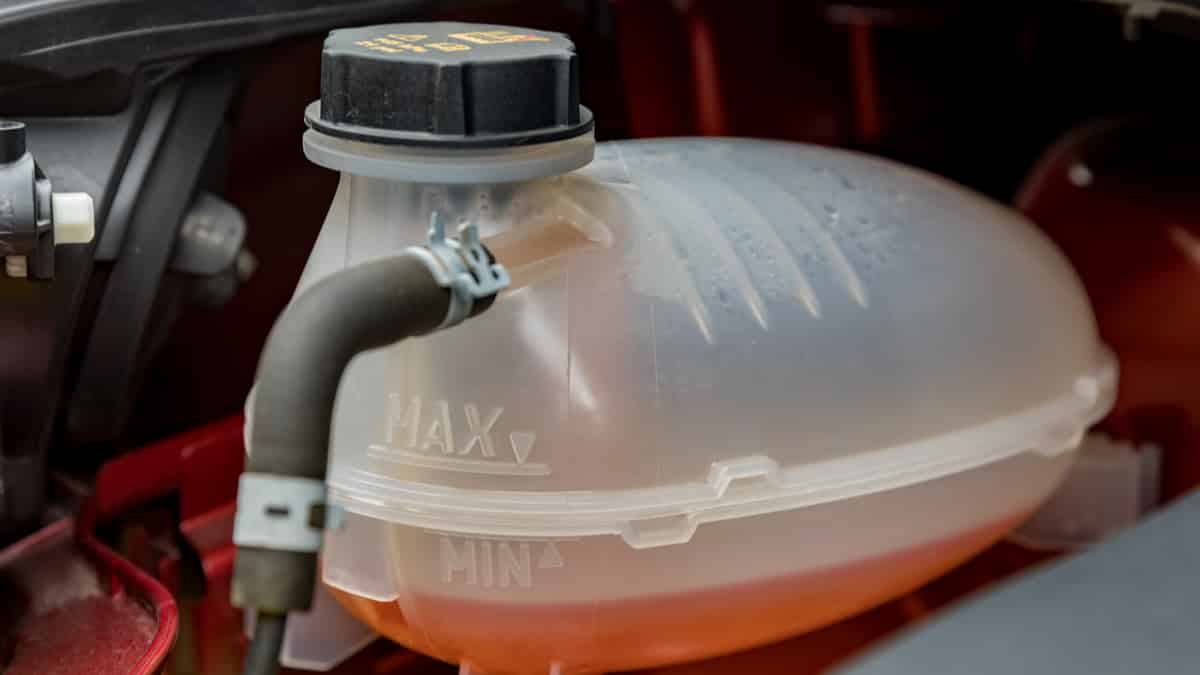
Regularly checking your coolant level and condition is essential for maintaining a healthy cooling system. The coolant level should be checked when the engine is cold, as the coolant expands when it's hot. Look for the coolant reservoir, which is usually a translucent plastic container located near the radiator. The reservoir should have markings indicating the "minimum" and "maximum" coolant levels. If the coolant level is below the "minimum" mark, add the appropriate type of coolant until it reaches the "maximum" mark. Also check the condition of the coolant. It should be clean and clear, with no signs of rust, debris, or oil contamination. If the coolant appears dirty or contaminated, it's time for a coolant flush. A coolant flush involves draining the old coolant from the system and replacing it with fresh coolant. This helps to remove any deposits or contaminants that have accumulated in the cooling system. Coolant flushes are typically recommended every two to five years, depending on the vehicle and the type of coolant used. By regularly checking your coolant level and condition, you can catch potential problems early and prevent more serious engine damage.
What If My Car Keeps Overheating?
If your car keeps overheating even after you've addressed the coolant bubbling issue, there may be an underlying problem that needs to be addressed. Possible causes include: A faulty thermostat. A clogged radiator. A malfunctioning water pump. A blocked cooling fan. A leaking head gasket. A damaged radiator hose. Start by checking the thermostat to make sure it's opening and closing properly. You can do this by removing the thermostat and testing it in a pot of boiling water. If the thermostat doesn't open, it needs to be replaced. Next, check the radiator for clogs. You can do this by visually inspecting the radiator core for any signs of debris or buildup. If the radiator is clogged, it needs to be flushed or replaced. Also check the water pump for any signs of leaks or damage. A failing water pump may not be able to circulate coolant properly, leading to overheating. Finally, check the cooling fan to make sure it's turning on when the engine gets hot. If the fan isn't working, it needs to be repaired or replaced. By systematically checking these components, you can identify the cause of the overheating and take steps to resolve the issue.
Coolant Bubbling Checklist: Quick Troubleshooting Steps
Here's a quick checklist to help you troubleshoot coolant bubbling: Check the coolant level: Ensure the coolant level is within the "minimum" and "maximum" marks on the reservoir. Inspect the radiator cap: Look for any signs of damage or corrosion. Pressure test the cap if possible. Check for leaks: Inspect hoses, the radiator, the water pump, and the reservoir for leaks. Check for overheating: Monitor the temperature gauge and be alert for any signs of overheating. Check for exhaust gases in the coolant: Use a block tester to check for the presence of combustion gases in the cooling system. Inspect the oil: Look for a milky or foamy appearance, which can indicate a head gasket leak. Check the exhaust: Look for excessive white smoke, especially on startup. Check the radiator for clogs: Visually inspect the radiator core for any signs of debris or buildup. Check the thermostat: Make sure it's opening and closing properly. Check the water pump: Look for any signs of leaks or damage. Check the cooling fan: Make sure it's turning on when the engine gets hot. By following these steps, you can quickly identify the most likely cause of the coolant bubbling and take steps to resolve the issue.
Question and Answer
Here are some common questions and answers about coolant bubbling:
Q: Can I drive my car if the coolant is bubbling?
A: It's generally not recommended to drive your car if the coolant is bubbling, as it indicates a problem with the cooling system that could lead to overheating and engine damage. If you must drive, monitor the temperature gauge closely and pull over immediately if the engine starts to overheat.
Q: How often should I flush my coolant?
A: Coolant flushes are typically recommended every two to five years, depending on the vehicle and the type of coolant used. Refer to your owner's manual for specific recommendations.
Q: Can I mix different types of coolant?
A: It's generally not recommended to mix different types of coolant, as they may not be compatible and can lead to corrosion and other problems. Always use the type of coolant recommended by the manufacturer.
Q: Is coolant poisonous?
A: Yes, coolant is poisonous and should be handled with care. Avoid contact with skin and eyes, and keep it out of reach of children and pets. If swallowed, seek medical attention immediately.
Conclusion of Why is My Coolant Bubbling?
Coolant bubbling can be a symptom of various issues, ranging from a simple low coolant level to a more serious head gasket leak. By understanding the common causes and following the troubleshooting steps outlined in this article, you can better diagnose the problem and take appropriate action. Remember to prioritize safety and seek professional help when needed. Regular maintenance and proper cooling system care can go a long way in preventing coolant bubbling and ensuring the longevity of your engine. Keep an eye on those fluid levels, stay alert for any unusual smells or noises, and address any issues promptly to keep your car running smoothly for years to come!